TIps to Get Traffic To Your Website

There are number of websites or blogs running. And many bloggers are earning enough to live their life peacefully  And blogging requires lots of patience, consistency and work hard. Many bloggers do not success even after working hard. Do you know why?
Because of niches that are illegal. And topics which are related to piracy. Pirated softwares, Movies, Games, Apps, or Copyrighted data.

Top 5 Blog Topics that Will Make you More Money


Start a blog: You just need to have an attractive writing skills and  a little knowledge about webdesigning. Dont worry, if you dont know anything about blogging, MTW has the solution of beginners also. You can read our basic post to learn for creating a blog.

How To Add JQuery Fade Effect to Blogger blog?


In today's post you will leran how to add jquery fade effect for your images in blogger or any other web sites. I will explain you the very simple step to do so. its very easy and it takes less than few minutes. But I am sure this effect will add a very attractive appearance to your blog or web site.
Now without taking much more time I am giving you the steps.

How To Find Forgotten Email Address of Your Blogger Blog

How To Find Forgotten Email Address of Your Blogger Blog


Most of us have multiple Google Accounts and sometimes we don't remember the email address by which  you used to create your Blogger blog.
If you want to learn, how to create a blog?
then just read our post: create your Blogger blog.

Now we discuss about the existing blogs which are created on the email address which is forgotten.
So this short article will explain you the simple step to get your blogging email.

New Blogger interface introduced Permalink option to create custom URLs

In new Blogger interface there has introduced one more new and very useful feature for SEO of your blog. The new feature is "Custom Permalinks For Blogger Posts". SEO friendly custom URL is very usefull buit-in feature for your blogger posts. The best thing is that there is not character limit(39 characters) further with this custom permalinks in new blogger interface .

You can create your own URL for a any perticular or all posts, Here in this article we will learn how to create your own custom permalink.

Step 1:

You just have to click "permalink"  and select "Custom URL" as shown in the image.


Step2:

and then just enter your own customURL in the field given


If you wrote the post in Oct of 2012, your new URL will look like this:

http://MyTrickWays.com/2012/10/customURL.html

Yo can see the red colored bolded area is the portion of the URL that can be customized.

If the custom permalink which you entered already taken before, Then blogger will attempt to find a free one for you.

In this interface, the characters that are allowed in a custom URL are limited to: A-Z, a-z,  0-1. And the only special characters that are available: underscore, dash, and period.

How To Add Meta Description to Blogger without editing your HTML code

For every blog or website Meta description tags are very important to get optimized  in search engine. The new Blogger interface has an option to use your post and home page description. In today's article we will learn to add a meta description tag to Blogger blog without making any changes in template's HTML coding. But still there is no any option to add  meta keywords to your blog in Blogger Settings. You have to edit your template HTML code. Here we are going to discuss for adding Meta description only.


Meta Descriptions is a HTML attribute that is used to concise explanations of the contents of web pages, are commonly used by search engines on search results page to display preview snippets for a given page.


 How to add Meta description tags in your blogger blog:


The very 1st step is to go to your blog settings as shown in image:


Click on "Edit" of "Meta tags" section.


Now enter the desciption of your blog. and it should be a meaningful meta description.

And Click on "Save" link.


You have successfuly added a meta description to your blogger blog.

Note:
Subscribe us to get updated, and receive all the posts. And keep visiting MyTrickWays


top high paying google adsense alternatives


You always wish to earn online from your website or blog, The best and biggest advertising network is GoOgle adsense as it pay you the value your site deserve, And it is the only platform which makes your blog worthy. Google Adsense is the only online advertising network which is broadly used by countless visitors all across the world. Google Adsense enables you to monetize your blog or website with most worthy and desirable advertisements.

But generally Google does not accept small publishers in the advertising network. As there  are number of applications that are increasing in violation of rules and regulations. If you have a blog that is containing illegal content that dont apply for adsense as you might face detention in form of getting permanently banned from Adsense. So it would be better not to apply for Google Adsense until you design and establish a high profile website/blog.

That is why Small Publishers are looking for similar kind of advertising networks (an alternative) for their blogs/website. So in this article I will share the best Google Adsense alternatives. So all the small publishers can get approved and earn what they deserve.


Infolink  is the best alternative advertising network used instead of google adsense as It provides Intext advertising for all types of text based blogs or website. If you are getting a good traffic on your site and you have rich content in your blog or website then you can make a decent revenue with Infolinks. If you are intrested in this adsense alternative and you want to use Infolinks then you don't need to have a high profile designed website or blog . you just need to apply for a new Infolinks Publisher account and within 24 hours your account will be approved.


Get Started – Infolinks:
When you get approved from Infolinks, you can now integrate its ad with your site by simple method of integration. Once you have successfully integrated Infolinks with your blog or website, the infolinks bots will crawl your blog and according to your content the infolink would display all the matched keywords ads. you can check the statust of your earning at any time just by signing in to your Infolinks Publishers account.

Withdraw  – Infolinks:

Payment option: PayPal, BankWire Transfer
Minimum Payout:  50 dollars for PayPal  AND BankWire transfer minimum payout rate is 400 dollars


how to customize popular posts widget blogger?

Now you can change the look of your Popular Posts Widget of your blogger blog to make it more stylish and attractive for your readers. You should use a Popular Posts Widget in the sidebar of your blog as there are so many advantages. And this widgets enables your visitors to read and learn those popular articles that are most trending on a blog or website. As Built-in Popular posts widget in blogger is not that much attractive and attention-grabbing in terms of designing and displaying of popular posts. So if you are interested and you wish to change your Popular Posts widget into a stylish widget then, you have to work on CSS Style sheets.Don't worry I will explain you the simple steps to do this. Most bloggers ask to change their popular posts widget so I am sharing the customization of this built-in widget. In this article, we will learn how to customize Popular Posts Widget to make it more attractive and stylish.


 How to add Popular Post Widgets in blogger?


If you have not used Popular Posts Widget before, So have a look to add this by default widget.Otherwise leave this step.
Before customize Popular Posts Widget you have to add your default Widget that is buit-in widget of your blogger template. So explaining you the simple steps to add this widget.


  1. Go to Blogger account >> Select your blog >> Layout
  2. Click on "Add Gadget" in the column you wish to use this widget
  3. Select Popular Widget


Now you have installed a buit-in widget and next step is to customize this buit-in widget and make it more attractive for your readers.
We have successfully integrated a Popular Post widget on your blog

In built-in widget you can display up to 10 popular articles, but what I would recommend you, is to select only 7 as shown in this image

Now check the “Snippet” (optional) and “Image Thumbnail” because we are going to display images along the popular or trendy article, this will be more stylish and gonna make it more spice to your site.


 Customize the Popular Post Widget


Now you have already added a popular post widget and you wish to make it more spicy and attractive, then just follow these simple steps.


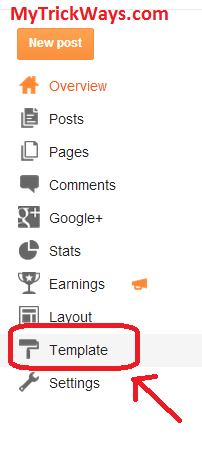
  1. go to Blogger >> Template 
  2. Now Select Edit HTML >> and then Proceed.

Now click on show widgets within your Template and  Search for "  ]]></b:skin> " you can use (CTRL+F ) to search this and just above it paste the following CSS Code shown below.

/*--- theTechCanvas --- */ .popular-posts ul{padding-left:0px;} .popular-posts ul li {background: #FFF url(https://blogger.googleusercontent.com/img/b/R29vZ2xl/AVvXsEhUyaJ4_h4RBCBCdzH9ev0crh-pYhmXynxFmiB87EI-HQ29LPmQgoVku3fHA_qSJPeplZ4ndnfydmBsKNibT640sdj4AQbP5I35jvJwzomYVxq-HflbPLulgYiGfS0xHoT6cCu5BFdswz0/s1600/1.gif) no-repeat scroll 5px 10px; list-style-type: none; margin:0 0 5px 0px; padding:5px 5px 5px 20px !important; border: 1px solid #ddd; border-radius:10px; -moz-border-radius:10px; -webkit-border-radius:10px; } .popular-posts ul li:hover { border:1px solid #6BB5FF; } .popular-posts ul li a:hover { text-decoration:none; } .popular-posts .item-thumbnail img { webkit-border-radius: 100px; -moz-border-radius: 100px; border-radius: 100px; -webkit-box-shadow: 0 1px 3px rgba(0, 0, 0, .4); -moz-box-shadow: 0 1px 3px rgba(0, 0, 0, .4); box-shadow: 0 1px 3px rgba(0, 0, 0, .4); }

Save the template and You have successfully customized your Popular Post Widget. Now see the changes in your blogger. Its more stylish and your trendy posts are appearing very attractive.

This will surely be liked by your visitors and definitely it will increase the number of your readers .
Enjoy your blogging with this customization and subscribe us to get our posts through your email.

How to check pagerank? Google Toolbar


Bloggers mostly ask one of the most common questions that how they find the page rank of their blogs/website according to Google. So this article will explain you about the tools which shows you the pagerank of your blog or website.

Thes Page Rank tool help us to determine the page rank of your blog and website and it also help us to find which sites are more popular and can be appeared on google search engine on the top position of search result.

Google Page Rank is calculated by google formula and its a scale from 1 to 10 according to the quality of your blog. The higher the page rank more popular is the site.

There are many websites available that provide services to check your blog/website pagerank. One of them is the PageRank Checker. You can also find this site on the search engines by keyword pagerank checker. To get a more accurate result to check your  pagerank, then you have another option that is Google Toolbar . This tool is (google pagerank) may be placed on the internet browser you are using i.e Google chrome, Internet Explorer,mozilla firefox, Opera etc. I use mozilla firefox because this browsers is easy to use and have number of tools.
To find your pagerank in mozilla firefox, download the Google Toolbar and select what features would you look at your browser.

And you have to restart your browser after installing the Google Toolbar.

To learn about pagerank and important values ​​of google pagerank of blogs/website pages as they appear, you stay hovering over the green diagram shown in the below image will show the pagerank of website pages that you have currently opend.


You are now using Google toolbar so you don't have to worry about the accuracy as its a Google Toolbar. And especially it was published rumors on the internet about pagerank forgery.

So Check your blog pagerank accurately!

content is king (Google loves fresh and unique content)


As we all know that google is the most popular search engine in the world. Every one search everything in google. So if you have a blog or website and you want to get a good search engine ranking then you need to have fresh and unique content on your blog/website because google does not prefer quantity but quality.
So write well and unique so that your page rank as well as your search engine ranking can be better.


 Use internal linking :


When you write your post link the keywords which are related to your already published posts. It increases your internal linking which is also the part of Search Engine Optimization (SEO). And it will increase your pagerank and quality of your content.

For example MyTrickWays can be used like MyTrickWays


 Upload Images in your own blog or website :


Most of the time we just use the links of images which are uploaded in different server. But don't do this! It shows the poor quality of your post content. And it also increases the loading time of your page. As the browser has to collect the data(images and Content) from the different servers and it takes more time than taken by same server (Ex- Blogger.com). So upload all the images of your posts on your own server to minimize the time of loading your page by the browser and to make your content better and get a good page rank as well as good search engine ranking.


 Unique and fresh content gives you ultimate traffic :


If you have good quality content then no one can stop to give you traffic. So the content is the main thing one should keep in mind who loves blogging.
Nothing matters more than quality content of your post.
So you must keep in mind three things while writing your posts. And these are :
Quality content, Quality content  and Only Quality of content!

How To Upload Template In Blogger? 3 Simple steps!


 How To Upload Template In Blogger?


You have a blog! And you are thinking that is it possible to design a blog like a very attractive website?
Then Blogger has an option for customization of your blogs by installing templates.
You can choose any templates from hundreds of templates available in many websites.


 Where to download blogger template ?


There are many websites from where you can download blogger templates such as:
Btemplates.com, TemplatesDoctor.com etc.
Now this article will explain you the steps to install and upload your template which you have downloaded from one of the above or any website.


 Step 1: Go to Template as shown in image :


 Step 2: Click on "Backup/restore" :


 Step 3: Choose File to upload your downloaded template : 


Before uploading your new template you should download your existing template so that you can again upload that template in future without any customization.

So these were the simple steps to upload and install any template you like. I hope you have learnt the way of uploading templates in blogger and make your blog attractive just like a big website.Video tutorials will also be published later.
Enjoy your blogging and keep visiting MyTrickWays.com

how to import blogger posts into wordpress? very simple steps!

If you have created a blog on wordpress platform of the existing topic which you are having on blogger platform. Then don't worry at all! This article expalin you very simple steps to import your all blogger posts into your new wordpress posts.
And You just need to do this process as early as possible after creating your wordpress blog so that your posts will be linked back into wordpress blog and remain listed in search engines.


Step 1Go to your WP-admin Panel >> Tools >> Import


Step 2: Click on the button shown in this image " blogger "


Step 3: Give the Authorization to wordpress to grant access !


You just give the permission to WordPress to access your existing Blogger account by click on the button shown here “Authorize”.


Step 3Now click on " grant access "


When you have granted the permission to wordpress to access your blogger account, you are now able to find a list of all the blogs of your certain Blogger account which is currently singed in. 


Step 3: import the one of your blogs listed here!


As shown in above image there are many blogs listed. These are the list of your blogs attached to your blogger account. 
You Just import that perticular blog which you want to import to WordPress by pressing “IMPORT” button shown in the right side of above image.Give the admin rights after the blog is completely imported into your wordpress account .

So you have imported all your blogger posts into wordpress.
I hope you have enjoyed and understood the way of importing.

Enjoy blogging!!

how to backup blogger posts and comments? [Download Blogger posts with images and comments]


Do you know that it is possible to download and back up your posts which you have published in your blog?
Yes you can download all the posts with images and labels of all the posts.
And anytime you can upload that downloaded posts to anyone of blogs.
Here, in this post I will explain you the steps to download your published posts in blogger.


Step 1: go to your blogger account and then click on settings as shown in the image: 


Step 2: Click on "other" shown in the image: 


Step 3: Now click on " Export" shown in this image


You are done this!!
Now you have saved your posts in your computer. And you also can import the saved data in your blog. This back up of your posts can be imported to any of your blogs.

I will publish some more usefull tips and tricks on this blog ( MyTrickWays.com). So please keep on visiting and enjoy blogging.


Redirect a BLOGSPOT to CUSTOM DOMAIN (Your own domain)

You will be happy to know about the redirection of your blog ( i.e MyTrickWays.blogspot.com to MyTrickWays.com).
Everyone wish to have their own hosted domain in blogger. So in this post I will explain you the steps to use your own domain name instead of .blogspot.com.


Step 1: First of All You just need to go to your blogger account and then click on setting as shown in the image: 


Step 2 : Click on  "+ Add a custom domain" as shown in below image 


Step 3: Now Click on " Switch to advance settings"


Step 4: Write the domain name you wish to redirect


Now save the settings and you are all set. And what you need is just to change the settings to your DNS ( Domain Name System ) in your Domain control panel according to your domain name service provider. Enjoy blogging!


    Create a blog in just 2 steps and less than 10 mins

    Blogging is a very intresting activity and so many people love blogging.

    Do you know, You too can blog.


    Believe me its very simple. You too can blog and create a very good small level websites.

    In this post I will teach you the steps to create a blog and then a post.


    Step 1:


    1. Go to Blogger.com
    2. And sign up using your google account.


      Step 2: Select The Title


      1. Select the title as shown in the given image
      2. Choose a  Blog Name
      3. Select A Theme you like ( A Template )
      4. Now Click On the Create Blog!
        Congratulation You have created a blog as i told you it is very simple. Now as you have created a blog, now you have to write something in your posts.
        So Below  I am giving you the steps to write a post with proper way!


        Step 3: Publishing Posts


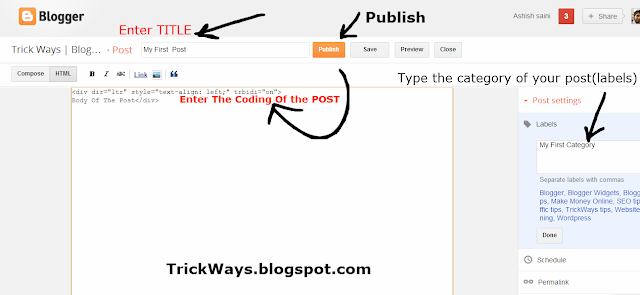
        1. Click on " NEW POST " as shown in the above image


        1. Now Enter The Title of the post you wish to publish
        2. Write the coding of your content which you want to publish on the place where arrow is shown in above image.
        3. Enter The Category of the post as shown by arrow on the right side in the obove image.
        4. Now finally Click on PUBLISH shown by arrow on the top of this image.

          So i hope you must have learnt  to create a blog. Enjoy your first blog and all the best for your fvery first blogging experience!

            Add Facebook Send Button To your Blogger Blogs.


            Facebook introduced the Facebook Like button in 2010 to help people for sharing interesting stuff with all their friends, but some people still needed a more private button that could let them share stuff with specific people. Finally this year Facebook introduced the  Send button,  which is the easiest way to  share things privately with groups, friends or individuals. I will explain you the steps in this post and we will learn  to add this important new social plugin to your blogger blogs. 


            How To Add Facebook Send Button To Blogger Blogs?

            Steps to add facebook send button to your blog.


            1. Go To Blogger > Design > Edit HTML
            2. Backup your template
            3. Click Expand widgets templates box
            4. Search for <data:post.body>


            If you want to add the send button just below your post titles then you have to add the given code below just above
            <data:post.body>
            or if you want to add the button at the end of your posts then paste the following code just below <data:post.body>

            <div id="fb-root"></div><script src="http://connect.facebook.net/en_US/all.js#xfbml=1"></script><fb:like href="" send="true" layout="button_count" width="450" show_faces="false" font=""></fb:like>

            Best High Paying CPM Advertising Networks

            Now you can convert your traffic into money. If you are getting a good traffic to your website or blog then you will be happy to know that there are many advertising networks which pay publishers according to their affiliation.
            There are various types of advertising which works on different process.
            So here are some high paying networks that pays you well according to your blog/site traffic.
            These are CPM networks.
            CPM is Cost Per Mile

            The very first one I recommend is Tribal Fusion.


            Tribal Fusion is most reputable CPM advertising Company which accepts only those websites or blog which are getting a Traffic of about 500,000 monthly Impressions. If you are selected as a premium publisher of tribal fusion then the chances are extremely high, that they might give you extraordinary rates with payment method of your own choice.

            Method of Payment : PayPal
            Minimum Payout: $50
            CPM Rate ( Cost per mile) : $10/per 1K (1000) impressions


            Value Click


            Value Click:  One more CPM (Cost Per Mile) advertising program which also pay you well if you have a decent traffic about 100 page views per day and it provides you quick payment, and there is also an option to track your impressions from their publisher control panel. The one thing you have to keep in mind is that they do not accept the sites containing adult or pirated content, so your website must have fresh and healthy content on your posts, if you really want to attract potential advertisers and earn enough to be satisfied. So If you are intrested with this advertising network.
            You can visite the site here, valueclick.com

            Payment Method: PayPal
            Minimum Payout: $50
            CPM Rate: It depends on quality of your website.
            Traffic Required: 3000 Pageviews Per Month


            AdPepper


            Honestly saying, this provider is not much good  if we compare it with above CPM providers i.e. Tribal Fusion and Value Click. It provides decent user-friendly experience with stunning CPM rate but lacks consistency. But  I think, you should try it out may be it would work for you.

            Payment Method: PayPal
            Minimum Payout: $50
            CPM Rate: Not Fixed or declared