Showing posts with label Blogger. Show all posts

How To Find Forgotten Email Address of Your Blogger Blog

How To Find Forgotten Email Address of Your Blogger Blog


Most of us have multiple Google Accounts and sometimes we don't remember the email address by which  you used to create your Blogger blog.
If you want to learn, how to create a blog?
then just read our post: create your Blogger blog.

Now we discuss about the existing blogs which are created on the email address which is forgotten.
So this short article will explain you the simple step to get your blogging email.

New Blogger interface introduced Permalink option to create custom URLs

In new Blogger interface there has introduced one more new and very useful feature for SEO of your blog. The new feature is "Custom Permalinks For Blogger Posts". SEO friendly custom URL is very usefull buit-in feature for your blogger posts. The best thing is that there is not character limit(39 characters) further with this custom permalinks in new blogger interface .

You can create your own URL for a any perticular or all posts, Here in this article we will learn how to create your own custom permalink.

Step 1:

You just have to click "permalink"  and select "Custom URL" as shown in the image.


Step2:

and then just enter your own customURL in the field given


If you wrote the post in Oct of 2012, your new URL will look like this:

http://MyTrickWays.com/2012/10/customURL.html

Yo can see the red colored bolded area is the portion of the URL that can be customized.

If the custom permalink which you entered already taken before, Then blogger will attempt to find a free one for you.

In this interface, the characters that are allowed in a custom URL are limited to: A-Z, a-z,  0-1. And the only special characters that are available: underscore, dash, and period.

How To Add Meta Description to Blogger without editing your HTML code

For every blog or website Meta description tags are very important to get optimized  in search engine. The new Blogger interface has an option to use your post and home page description. In today's article we will learn to add a meta description tag to Blogger blog without making any changes in template's HTML coding. But still there is no any option to add  meta keywords to your blog in Blogger Settings. You have to edit your template HTML code. Here we are going to discuss for adding Meta description only.


Meta Descriptions is a HTML attribute that is used to concise explanations of the contents of web pages, are commonly used by search engines on search results page to display preview snippets for a given page.


 How to add Meta description tags in your blogger blog:


The very 1st step is to go to your blog settings as shown in image:


Click on "Edit" of "Meta tags" section.


Now enter the desciption of your blog. and it should be a meaningful meta description.

And Click on "Save" link.


You have successfuly added a meta description to your blogger blog.

Note:
Subscribe us to get updated, and receive all the posts. And keep visiting MyTrickWays


How To Upload Template In Blogger? 3 Simple steps!


 How To Upload Template In Blogger?


You have a blog! And you are thinking that is it possible to design a blog like a very attractive website?
Then Blogger has an option for customization of your blogs by installing templates.
You can choose any templates from hundreds of templates available in many websites.


 Where to download blogger template ?


There are many websites from where you can download blogger templates such as:
Btemplates.com, TemplatesDoctor.com etc.
Now this article will explain you the steps to install and upload your template which you have downloaded from one of the above or any website.


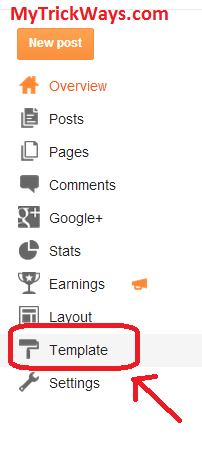
 Step 1: Go to Template as shown in image :


 Step 2: Click on "Backup/restore" :


 Step 3: Choose File to upload your downloaded template : 


Before uploading your new template you should download your existing template so that you can again upload that template in future without any customization.

So these were the simple steps to upload and install any template you like. I hope you have learnt the way of uploading templates in blogger and make your blog attractive just like a big website.Video tutorials will also be published later.
Enjoy your blogging and keep visiting MyTrickWays.com

how to backup blogger posts and comments? [Download Blogger posts with images and comments]


Do you know that it is possible to download and back up your posts which you have published in your blog?
Yes you can download all the posts with images and labels of all the posts.
And anytime you can upload that downloaded posts to anyone of blogs.
Here, in this post I will explain you the steps to download your published posts in blogger.


Step 1: go to your blogger account and then click on settings as shown in the image: 


Step 2: Click on "other" shown in the image: 


Step 3: Now click on " Export" shown in this image


You are done this!!
Now you have saved your posts in your computer. And you also can import the saved data in your blog. This back up of your posts can be imported to any of your blogs.

I will publish some more usefull tips and tricks on this blog ( MyTrickWays.com). So please keep on visiting and enjoy blogging.


Redirect a BLOGSPOT to CUSTOM DOMAIN (Your own domain)

You will be happy to know about the redirection of your blog ( i.e MyTrickWays.blogspot.com to MyTrickWays.com).
Everyone wish to have their own hosted domain in blogger. So in this post I will explain you the steps to use your own domain name instead of .blogspot.com.


Step 1: First of All You just need to go to your blogger account and then click on setting as shown in the image: 


Step 2 : Click on  "+ Add a custom domain" as shown in below image 


Step 3: Now Click on " Switch to advance settings"


Step 4: Write the domain name you wish to redirect


Now save the settings and you are all set. And what you need is just to change the settings to your DNS ( Domain Name System ) in your Domain control panel according to your domain name service provider. Enjoy blogging!


    Create a blog in just 2 steps and less than 10 mins

    Blogging is a very intresting activity and so many people love blogging.

    Do you know, You too can blog.


    Believe me its very simple. You too can blog and create a very good small level websites.

    In this post I will teach you the steps to create a blog and then a post.


    Step 1:


    1. Go to Blogger.com
    2. And sign up using your google account.


      Step 2: Select The Title


      1. Select the title as shown in the given image
      2. Choose a  Blog Name
      3. Select A Theme you like ( A Template )
      4. Now Click On the Create Blog!
        Congratulation You have created a blog as i told you it is very simple. Now as you have created a blog, now you have to write something in your posts.
        So Below  I am giving you the steps to write a post with proper way!


        Step 3: Publishing Posts


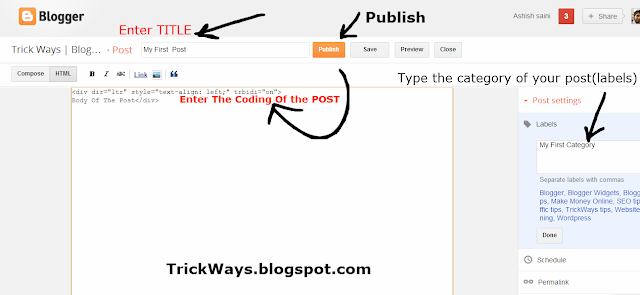
        1. Click on " NEW POST " as shown in the above image


        1. Now Enter The Title of the post you wish to publish
        2. Write the coding of your content which you want to publish on the place where arrow is shown in above image.
        3. Enter The Category of the post as shown by arrow on the right side in the obove image.
        4. Now finally Click on PUBLISH shown by arrow on the top of this image.

          So i hope you must have learnt  to create a blog. Enjoy your first blog and all the best for your fvery first blogging experience!

            Add Facebook Send Button To your Blogger Blogs.


            Facebook introduced the Facebook Like button in 2010 to help people for sharing interesting stuff with all their friends, but some people still needed a more private button that could let them share stuff with specific people. Finally this year Facebook introduced the  Send button,  which is the easiest way to  share things privately with groups, friends or individuals. I will explain you the steps in this post and we will learn  to add this important new social plugin to your blogger blogs. 


            How To Add Facebook Send Button To Blogger Blogs?

            Steps to add facebook send button to your blog.


            1. Go To Blogger > Design > Edit HTML
            2. Backup your template
            3. Click Expand widgets templates box
            4. Search for <data:post.body>


            If you want to add the send button just below your post titles then you have to add the given code below just above
            <data:post.body>
            or if you want to add the button at the end of your posts then paste the following code just below <data:post.body>

            <div id="fb-root"></div><script src="http://connect.facebook.net/en_US/all.js#xfbml=1"></script><fb:like href="" send="true" layout="button_count" width="450" show_faces="false" font=""></fb:like>

            What is a blog?

            What is a blog?

            Blog is just like a website (Dynamim website)
            which should be updated frequently.
            You can have the number of explanations and definitions for a blog ranging from broad to highly technical. But I would like to explain the concept of a blog in a detailed manner before teaching you the concept of its designing.

            Generally blogs are writings done by a single person and updated almost regularly but sometimes a group of people maintain blogs. The process of writing in blogs is called blogging and the person who writes is called a blogger. Each piece of writing in a blog is called blog post or simply post. Blogs can be of any topic and often a particular theme is selected for blogging but not always. Some people blog just because it’s their passion but blogs are also a great source of income. There are various professional bloggers around the world who rely only on blogging for their living. Blogs can also said to be websites but they show significant deviations from the characteristics of a normal website. If you know how to create a blog, you will surely be aware of the differences also. The primary difference is that the content is added in a sequential order. There is usually a regular updating of content in a blog unlike that of a website. There is an option for the readers to post their comments. It is also possible for the other bloggers to interact with the help of pingbacks and trackbacks. Blogs are liable to constant evolutions and as the internet is dynamic in nature, the scope and nature of blogs too change. Thus is will surely be unjust if blogs are restricted to any particular single definition. The definition obviously keeps on changing with the passage of time. There are a lot of purposes for creating a blog and it depends on those who create it.